
KafkaConnect with EventStreams
Introduction
This post is intended to explain how connectors for EventStreams can be deployed. The EventStreams connectors are provided with KafkaConnect. the list of connectors that has been tested and that are supported can be found here: EventStreams connectors
It is also possible to use other KafkaConnectors.
This post explains how a KafkaConnector container can be build, deploy in IBM Cloud registry and use in an openshift cluster. The connector use for this tutorial is an IBM MQ source connector.
prerequisites
- OCP cluster where EventStreams is installed
- Git or access to github
- Maven
- Docker or a container framework to build a container image. I am using the pod manager tool - podman
- Container image registry. I am using the IBM Cloud registry.
- For the IBM Cloud registry you will need to use the cloud cli
- The container-registry plugin for ibmcloud
ibmcloud plugin install container-registry
KafkaConnect Setup
The connector it self is a plugin installed on a container with the KafkaConnect framework. The connector is running on a worker pod with a distributed mode to allow easy scaling and load redistribution. The plugin installation is simply a connector Jar that is provided to the KafkaConnect worker node. Once the connector is deployed, the configuration for this plugin, is provided using using a KafkaConnect configuration k8s object.
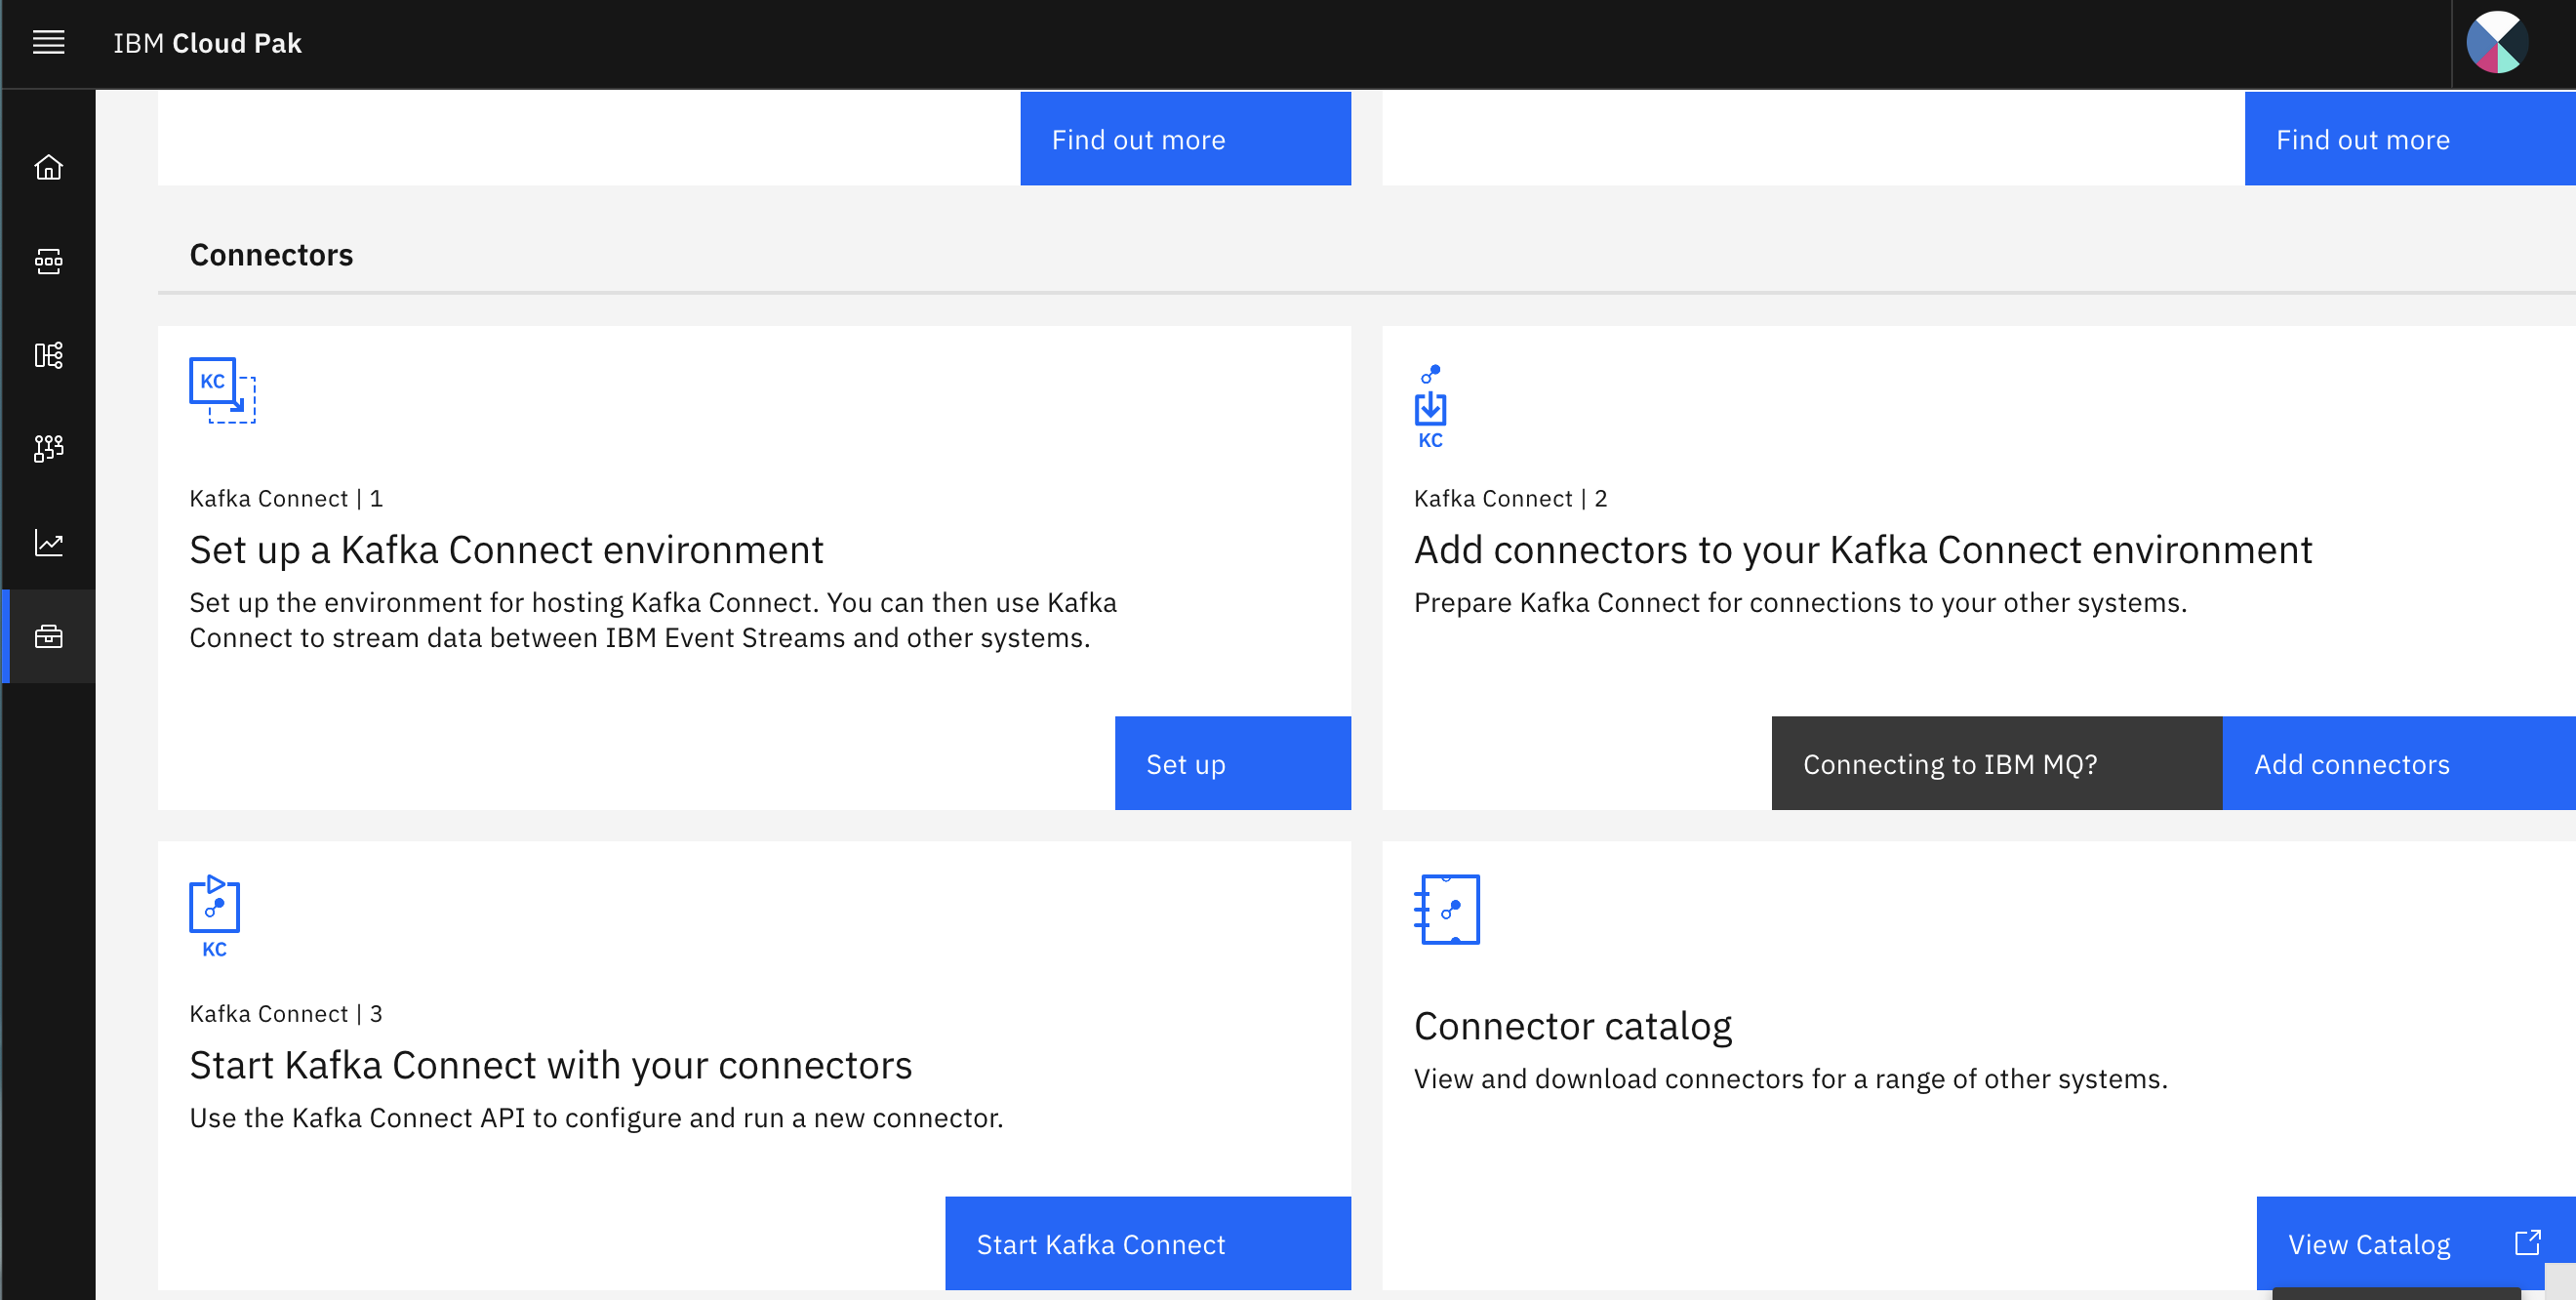
IBM EventStreams provides through its UI different tools to help building the connector. There are decomposed in three steps:
- Configure the KafkaConnect environment
- Add the connectors with its configuration
- Deploy and Start the connector.
These different steps are shown in the following screenshot of the EventStreams UI:
Step 1 - Kafka Connect environment
This section is about configuring the KafkaConnect framework. The KafkaConnect framework can be downloaded straight away from the EventStreams UI: it’s a zip file containing the DockerFile to build the image and the KafkaConnect configuration file that will be used in the third section.
The steps are:
- Download the KafkaConnect framework
- Unzip it in a directory. Let’s call it “es-kafkaconnect”.
The directory has the following content:
- DockerFile used to build the container image to run the connector.
- kubectl (will be used to create the k8s object - you can also use the oc cli)
- kafka-connect.yaml : this file will be used in the third section to deploy the connector on the cluster
- my-plugins directory. This directory is empty and it’s where we are going to place the connector plugin (jar file)
Step 2 - Add the connectors
In this section, you will
- build the plugin connector
- build the container image for the KafkaConnect connector
- publish the image into the IBM Cloud registry
The plugin connector
The help section in the EventStreams UI provides you information on how to build this connector. If you plan to run an MQ Connector, there is a wizard provided to generate the MQ Connector configuration that will be used by the connector to know how to connect to MQ.
The wizard generates a KafkaConnector object that needs to be deployed on the cluster to provide the configuration to the connector. This file will be used in the last step when we will start the connector.
The first step is to build the plug-in jar. For MQ Source, all the source to build the plugin is available on the KafkaConnect MQ Source github. The steps are
- Clone the git repository
- Build the plugin by running the
mvn clean package. It will be generated in the directory “target” as a single JAR called “kafka-connect-mq-source--jar-with-dependencies.jar" which contains all of the required dependencies.
The jar file needs to be copied into the KafkaConnect directory “es-kafkaconnect” that we prepared in the step 1.
build the KafkaConnect image
Build the KafkaConnect container image using the DockerFile. Navigate to the directory “es-kafkaconnect” and run
podman build -t es-connect:latest .
“es-connect” is the name of the container image and latest is the tag.
you can use Docker as well if using podman, you might need to init and start the machine: podman machine init && podman machine start
Once the image has been build you can list it:
$>podman images                                                                                                                                                                                                                          1.515s  (master|✚?) 18:05
REPOSITORY                           TAG         IMAGE ID      CREATED        SIZE
localhost/es-connect                 latest      12a08c7dc9ca  2 months ago   732 MB
push the image in the IBM Cloud registry
In this post, the KafkaConnect connector image that we have built on the previous section will be pushed into the IBM Cloud registry.
- Login into IBM Cloud
ibmcloud login -sso
- Login in registry
You can list the registries available in your region with the command:
ibmcloud cr namespace-list -v
Listing namespaces for account 'Test's Account' in registry 'de.icr.io'...

Namespace   Resource Group   Created
cp4i        default          2 years ago

OK
you can change the region if your repo is in another region using for example “ibmcloud cr region-set eu-central” Login into your registry:
ibmcloud cr login --client podman
- Push the image in the registry You can then push your image into your registry (where “cp4i” is the registry):
podman push localhost/es-connect:latest de.icr.io/cp4i/es-connect:latest
where localhost/es-connect:latest is the image that we have built de.icr.io/cp4i/es-connect:latest =
/ / :
You can list the images in your registry using the command “ibmcloud cr image-list”:
$>ibmcloud cr image-list                                                                                                                                                                                                                23.571s  (master|✚?) 18:24
Listing images...

Repository                          Tag      Digest         Namespace   Created        Size     Security status
de.icr.io/cp4i/es-connect           latest   bb405603abd4   cp4i        2 months ago   471 MB   12 Issues
Step 3 - Deploy and Run the KafkaConnect connector
This last section explains how to run the image that has been built and pushed into the IBM Cloud registry.
To run the KafkaConnect connector we will
- Configure Kafka to allow the connector connection. This includes certificates for the Kafka connect cluster connection and a Kafka User allowing the connector to access the Kafka Cluster
- A KafkaConnect CR that defines the image to be used and the configuration required to connect to the KafkaCluster
- A KafkaConnector CR to configure the MQ Source plugin that holds the MQ Configuration to allow the connector to connect to MQ
KafkaConnect CR
In order to run the KafkaConnect image, we need to define
- the KafkaConnect CR
- the KafkaUser to access the Kafka Broker
- the certificate for the TLS connection between the connector and the Kafka Broker
- the credentials to pull the image from the registry
Let’s first configure the KafkaConnect CR:
apiVersion: eventstreams.ibm.com/v1beta2
kind: KafkaConnect
metadata:
  name: es-connect
  annotations:
    eventstreams.ibm.com/use-connector-resources: "true"
spec:
  replicas: 1
  bootstrapServers: development-kafka-bootstrap.event.svc:9093
  image: de.icr.io/cp4i/es-connect
  template:
    pod:
      imagePullSecrets:
      - name: all-icr-io
      metadata:
        annotations:
          eventstreams.production.type: CloudPakForIntegrationNonProduction
          productID: 2a79e49111f44ec3acd89608e56138f5
          productName: IBM Event Streams for Non Production
          productVersion: 11.0.3
          productMetric: VIRTUAL_PROCESSOR_CORE
          productChargedContainers: es-connect-connect
          cloudpakId: c8b82d189e7545f0892db9ef2731b90d
          cloudpakName: IBM Cloud Pak for Integration
          cloudpakVersion: 2022.2.1
          productCloudpakRatio: "2:1"
  config:
    group.id: connect-cluster
    offset.storage.topic: connect-cluster-offsets
    config.storage.topic: connect-cluster-configs
    status.storage.topic: connect-cluster-status
    config.storage.replication.factor: 3
    offset.storage.replication.factor: 3
    status.storage.replication.factor: 3
  authentication:
    type: tls
    certificateAndKey:
      secretName: es-connect
      certificate: user.crt
      key: user.key
  tls:
    trustedCertificates:
      - secretName: development-cluster-ca-cert
        certificate: ca.crt
- Name of the KafkaConnect worker is “es-connect” this will be used later to associate the connector
- bootstrapserver: this is the KafkaBroker bootstrap. It can be found in the eventstreams UI
- image: this is the image name of the KafkaConnect that we have build
- The imagePullSecrets is used to get access to the registry where the KafkaConnect image is stored
The registry used is in the IBM Cloud. In RedHat Openshift deployed on IBM Cloud, the default namespace has a secret allowing to access all the IBM Cloud registry that you hold. You can copy this secret into the namespace where you want to deploy the KafkaConnect worker.
oc get secret all-icr-io -n default -o yaml | sed 's/default/<new-project>/g' | oc create -n <new-project> -f - - authentication
This is used to authenticate against EventStreams. For internal communication, the connection to EventStreams is secured using TLS.
The required credentials can be created using the EventStreams UI.
- Select the event streams instance
- Select connect to this cluster
- Select internal connection and click to generate the credentials.
The wizard will create a KafkaUser with the roles that you have selected in the wizard and a secret will be created on the cluster with the same name (KafkaUser and the secret is “es-connect”).
If you are using the EventStreams UI, it is possible to generate the required credentials straight away from the UI.
The UI will generates the KafkaUser behind the scene.
-
tls section
This section defines the secret containing the Kafka broker certificate that will be used to trust the Kafka Broker. I have used the secret created by EventStreams when the Kafka broker has been created. The name of the secret follows the following layout: “-cluster-ca-cert". -
image corresponds to the KafkaConnect container image that you are going to build and push into a registry. In my case I plan to build the container image called “es-connect” and push it into an IBM Cloud registry “de.icr.io/cp4i”.
Kafka Connector CR
This custom resource holds the information to configure the KakfaConnector. In this can the connector is MQ.
The link between the KafkaConnector and KafkaConnect is made using the label “eventstreams.ibm.com/cluster”. This label needs to match the KafkaConnect name.
The file looks like:
apiVersion: eventstreams.ibm.com/v1beta2
kind: KafkaConnector
metadata:
  name: mq-source
  labels:
    eventstreams.ibm.com/cluster: <kafka_connect_name>
spec:
  class: com.ibm.eventstreams.connect.mqsource.MQSourceConnector
  tasksMax: 1
  config:
    mq.queue.manager: "myQMgr"
    mq.connection.name.list: " "
    mq.channel.name: "My.Srv.Conn.channel"
    mq.queue: "My.LQ.Incoming.KafkaEvent"
    mq.user.name: "mq.user"
    mq.password: "mq.user.password"
    topic: "My.Kafka.SourceTopic.Name"
    mq.connection.mode: client
    mq.record.builder: com.ibm.eventstreams.connect.mqsource.builders.DefaultRecordBuilder
    key.converter: org.apache.kafka.connect.storage.StringConverter
    value.converter: org.apache.kafka.connect.storage.StringConverter
Please note that you need to configure MQ to allow the connector to connect to IBM MQ. In this example, the queue manager has been configured to allow the connector to connect using a client connection.
You can find detailed information about the
- how to setup and run connectors on the EventStream Documentation
- the MQ Connector at the following MQ git repo
Commands
You can retrieve information about the connector by executing curl command directly on the container.
Get information about plugins
curl localhost:8083/connector-plugins | jq
Get information about connectors
 curl -X GET -H "Content-Type: application/json" http://localhost:8083/connectors/file-sink/status | jq
 curl -X GET -H "Content-Type: application/json" http://localhost:8083/connectors/file-sink\?expand=status | jq
 curl -X GET -H "Content-Type: application/json" http://localhost:8083/connectors/file-sink\?expand=info | jq
 curl -X GET -H "Content-Type: application/json" http://localhost:8083/connectors/file-sink/config | jq
Configure a connector:
curl -X PUT -H "Content-Type: application/json" http://localhost:8083/connectors/file-sink/config --data "@./connect/file-sink.json"
Resources
Dale Lane kafka connect tutorial Dale Lane blog on MQ streaming and KafkaConnect
- https://strimzi.io/blog/2021/03/29/connector-build/
- https://www.ibm.com/docs/en/ibm-mq/9.2?topic=manager-example-configuring-tls

Leave a comment